Introduction to Server Side Rendering with Parcel 🚀
A blog posts that discusses how to implement SSR with ParcelJS
I love teaching stuff, it is my passion, I love to build stuff for fun just as I love lego building blocks.
Hey folks, when building web applications, we have heard about various rendering patterns, namely client-side rendering and server-side rendering, static rendering, Incremental Static Regeneration and the newer approaches like island pattern, resumability, etc. while the choice of rendering patterns depends on the use case, some of the patterns require JavaScript code to be sent to the browser to make them interactive, loosely this process is called hydration. Hydration is the process of attaching event handlers to static HTML to make the page interactive. In this post, we will discuss what hydration is and what role it plays in SSR. We will also cover the following concepts viz. transpiling, bundling, and concepts related to Parcel.
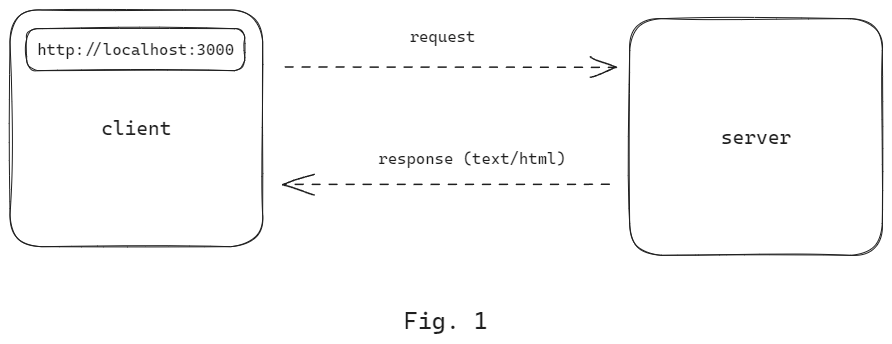
Let's talk about Server Side Rendering, In SSR the HTML page is generated on the server and is then sent to the client. The client hits the endpoint, server returns the HTML. Repo link here.
Now let us implement this concept in Express. I'm using pnpm, however, you can choose a package manager of your choice
pnpm init -y
pnpm add -D parcel
pnpm add express react react-dom
We require parcel js for packaging our code for the following reasons which are discussed below. After installation, this is what our package.json will look like
{
  "name": "parcel-ssr-demo",
  "version": "1.0.0",
  "description": "a expressjs-parcel-ssr demo",
  "scripts": {
    "test": "ECHO run commands here",
  },
  "keywords": ["parcel", "ssr", "express", "react"],
  "author": "yashone7",
  "license": "ISC",
  "devDependencies": {
    "nodemon": "^3.0.1",
    "parcel": "^2.9.3",
    "process": "^0.11.10"
  },
  "dependencies": {
    "express": "^4.18.2",
    "react": "^18.2.0",
    "react-dom": "^18.2.0"
  }
}
Now is the time we talk about the things specific to NodeJS, In NodeJs, you can write the code in 2 styles.
CommonJS module
ESM (EcmaScript Modules)
CJS is the plain old require syntax while the ESM is the modern import syntax, and hence we must add a field "type": "module" if we want to use ESM. But if you look at the GitHub repo example I have given commonjs but I still wrote the code in import syntax it is because I am transpiling the code into cjs with my build tool.
Now let's set up our server.js file.
import express from "express";
import App from "./client/App";
import ReactDOM from "react-dom/server";

const app = express();

app.use(express.static("build")); // for serving static files ex.
// js/css/images etc

const port = 3000;

app.get("/", (req, res, next) => {
  const initialState = { count: 3 };

  const appMarkup = ReactDOM.renderToString(
    <App initialProps={initialState} />
  );

  const html = `
    <html>
      <head>
        <title>Your React App</title>
      </head>
      <body>
        <div id="root">${appMarkup}</div>
        <script>
          window.initialState = ${JSON.stringify(initialState)};
        </script>
        <script src="index.js" async type="text/javascript"></script>
      </body>
    </html>
  `;

  res.send(html);
});

app.listen(port, () => console.log("server running on port 3000"));
If you look at the code snippet above, we have initialized an express js application and we have added a route handler for the baseUrl. In the App.jsx file I have written a simple code that increments/decrements the count.
App.jsx
import React, { useState } from "react";

function App({ initialProps }) {
  console.log(initialProps);

  const [_count, setCount] = useState(initialProps.count);

  return (
    <>
      <div>React Server Side rendering Example</div>
      <button onClick={() => setCount((prevCount) => prevCount + 1)}>+</button>
      <p style={{ margin: "10px 20px" }}>{_count}</p>
      <button onClick={() => setCount((prevCount) => prevCount - 1)}>-</button>
    </>
  );
}

export default App;
What we are doing is that we are taking this App.jsx and we are rendering it to an HTML string and sending that to the browser. At this point, the page you see wouldn't be interactive. That is because we have not hydrated the page yet.
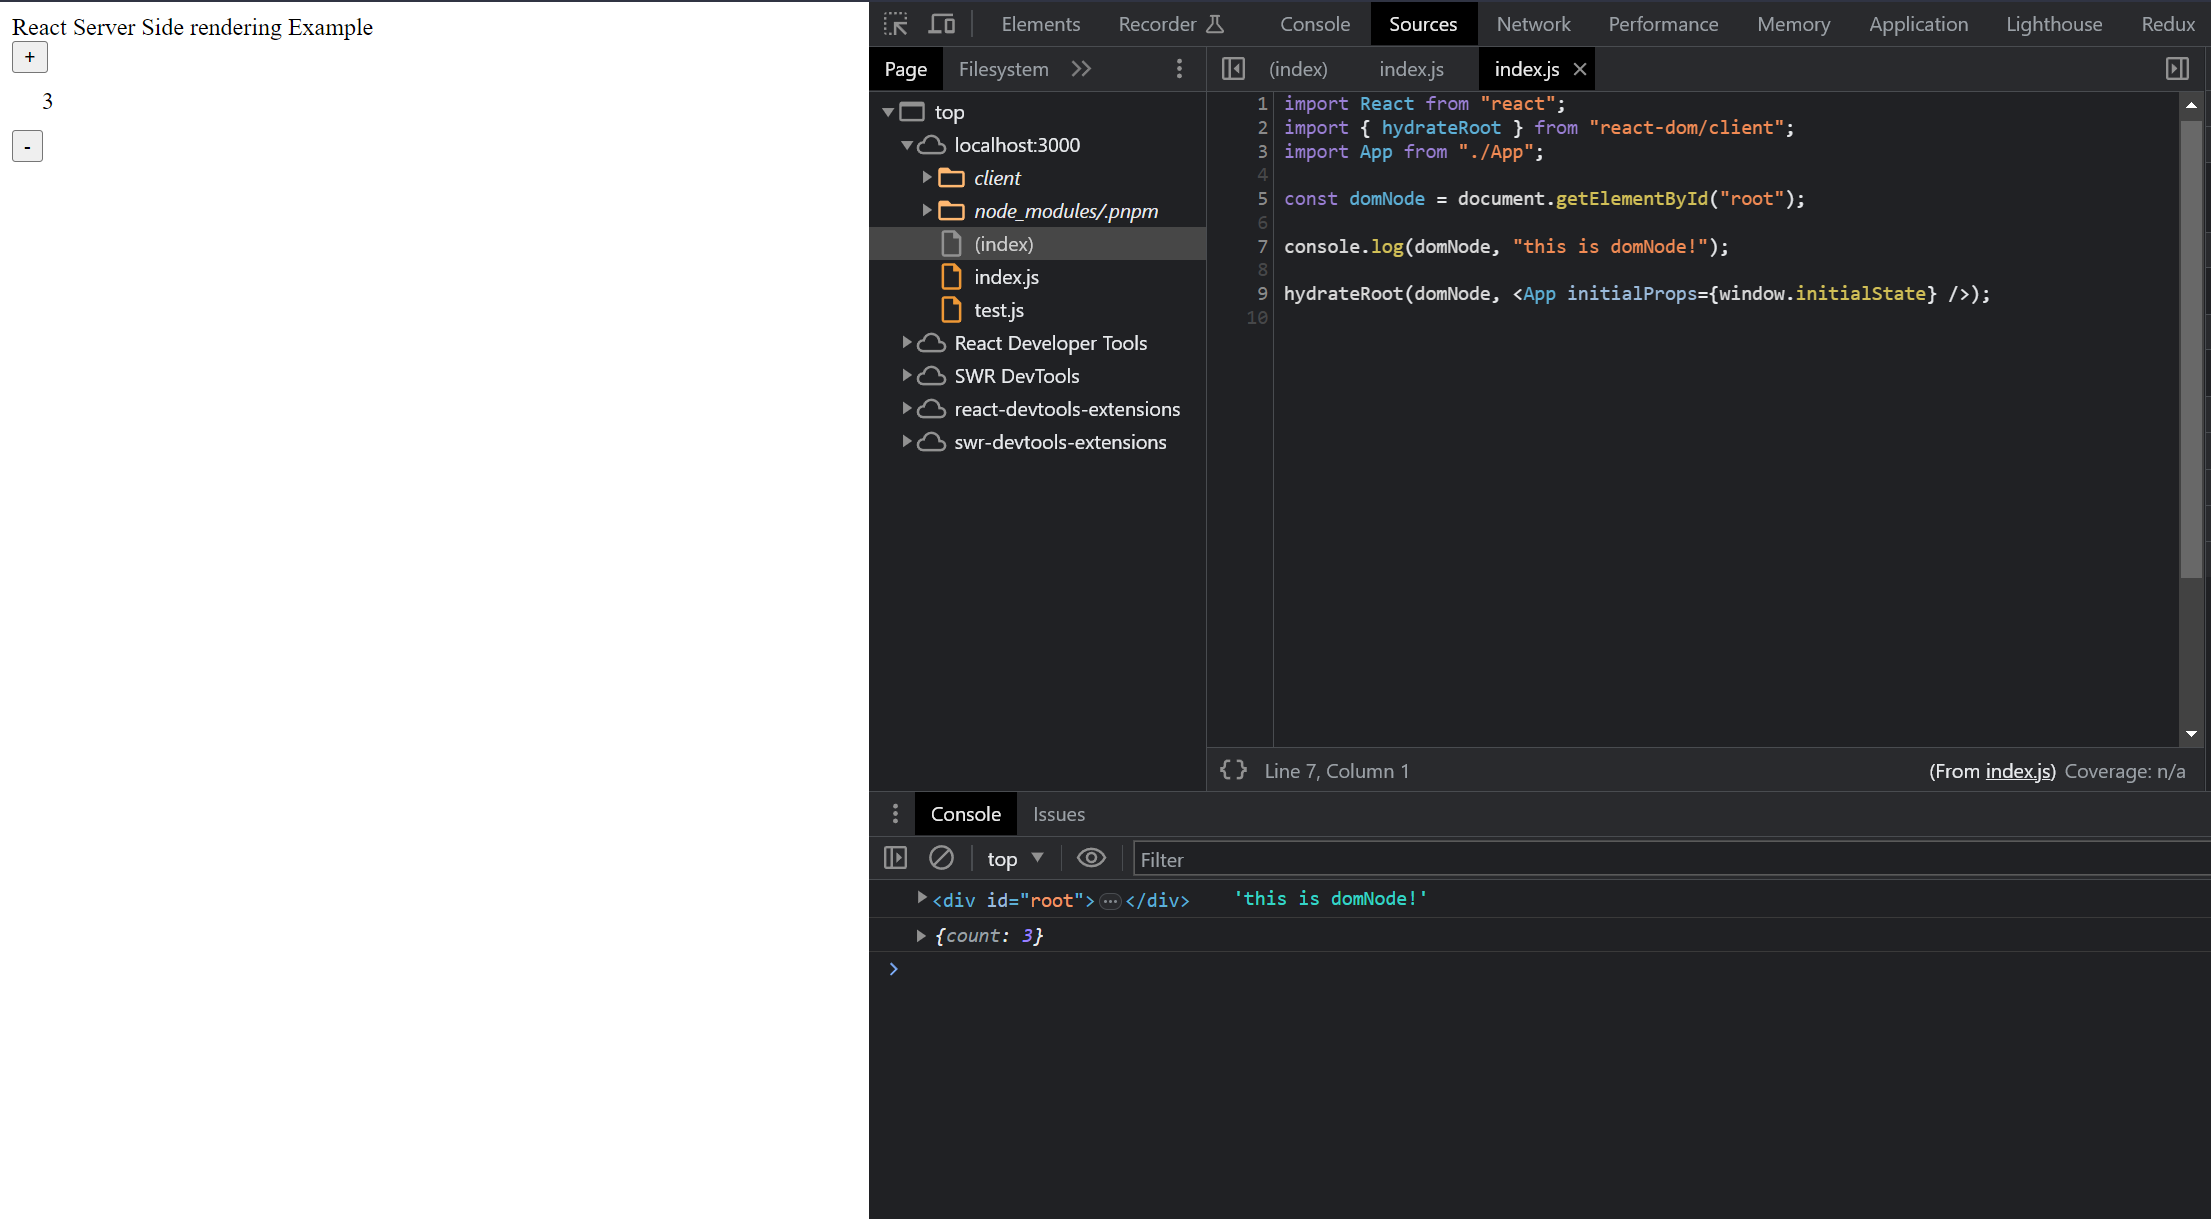
In the client folder you see in my repo, there is an index.js file, its purpose is to hydrate the HTML string, that was sent by the server to the user. Hydration is performed on the client side to make the page interactive.
import React from "react";
import { hydrateRoot } from "react-dom/client";
import App from "./App";

const domNode = document.getElementById("root");

console.log(domNode, "this is domNode!");

hydrateRoot(domNode, <App initialProps={window.initialState} />);
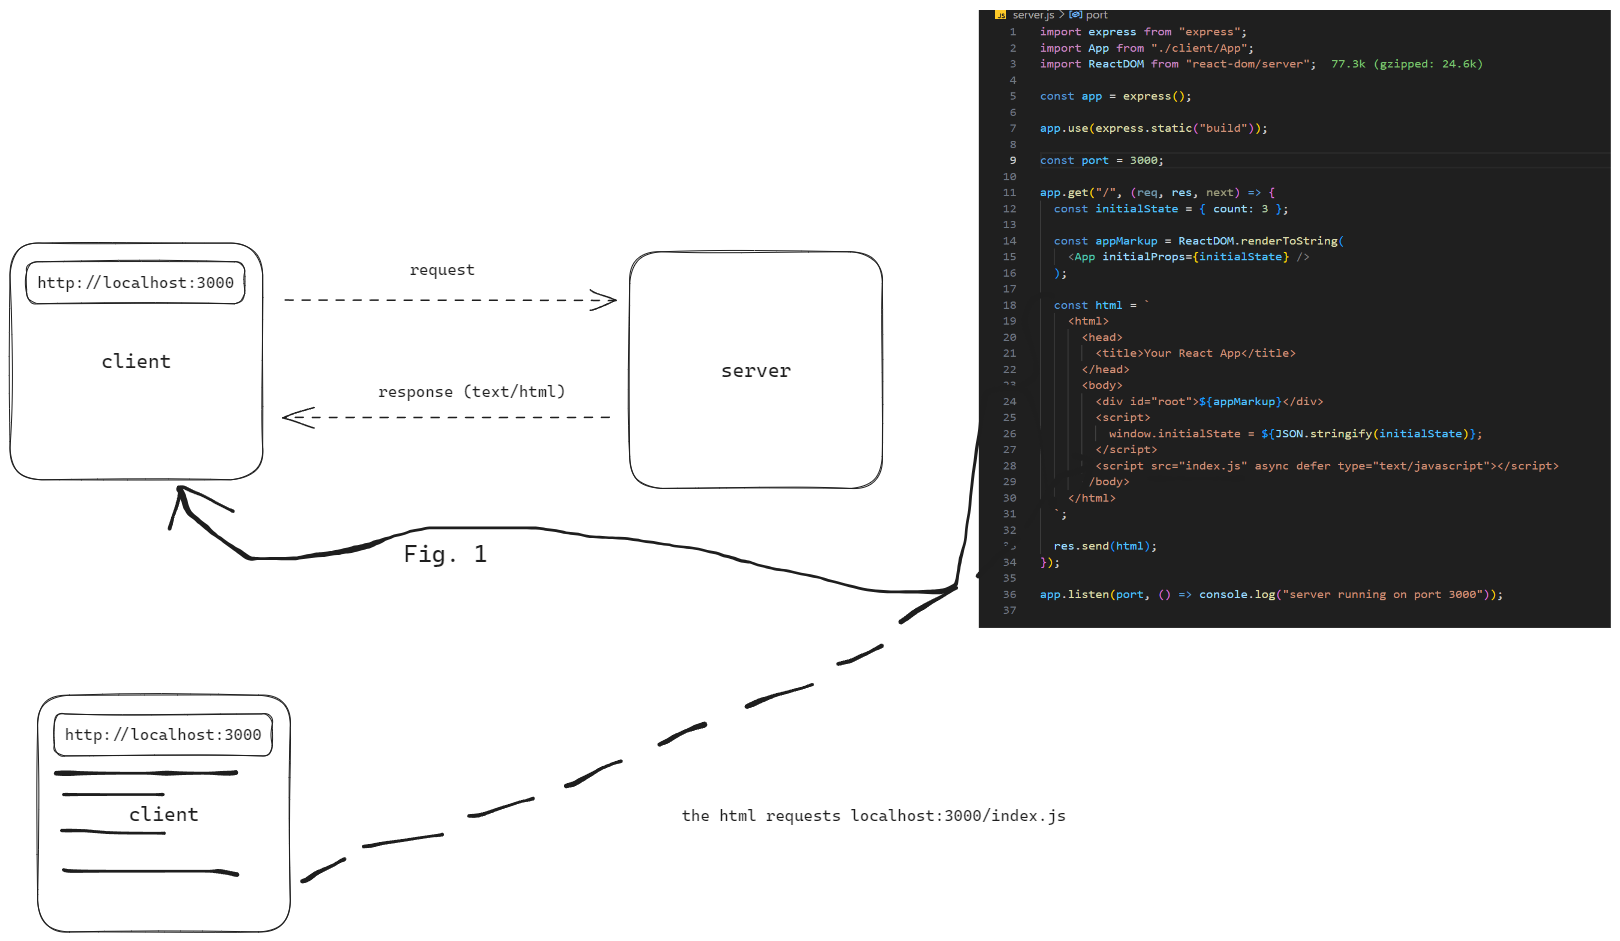
The html string that was sent to the user requests for index.js from the server. The server sends the index.js to the user. If you look at the codebase we have used a middleware for serving static assets. When you hit the endpoint localhost:3000/index.js you should get a javascript file.
But wait NodeJs cannot understand JSX syntax, If you try to run the server without any build step you will get an error Unexpected token < which is why we should configure a build tool to handle such things.
Now let us set up Parcel, Parcel is a blazing fast zero configuration build tool for the web. It has a built-in module bundler, dev-server, image optimizer, css-minifier and many more baked into it.
Update your package.json file like so
{
  "name": "parcel-ssr-demo",
  "version": "1.0.0",
  "description": "a expressjs-parcel-ssr demo",
  "type": "commonjs",
 + "targets": {
 +   "backend": {
 +     "engines": {
 +       "node": ">=16.x" // min node version where compiled code can run
 +     },
 +     "context": "node", // context where the compiled code runs
 +     "includeNodeModules": true,
 +     "distDir": "./build", // output folder
 +     "outputFormat": "commonjs",
 +     "optimize": true,
 +     "sourceMap": false
 +   },
 +   "frontend": {
 +     "context": "browser",
 +     "distDir": "./build"
 +   }
 + },
  "scripts": {
 +   "build:client": "parcel watch client/index.js --target frontend",
 +   "build:server": "parcel watch server.js --target backend",
 +   "start:server": "nodemon build/server.js"
  },
  "keywords": [],
  "author": "",
  "license": "ISC",
  "devDependencies": {
    "nodemon": "^3.0.1",
    "parcel": "^2.9.3",
    "process": "^0.11.10"
  },
  "dependencies": {
    "cors": "^2.8.5",
    "express": "^4.18.2",
    "react": "^18.2.0",
    "react-dom": "^18.2.0"
  }
}
Let's talk about the changes.
The target option lets you specify which nature of your compiled code, You can have many targets for a single codebase, for example: frontend, frontend-legacy, backend, etc.
In
"backend"target, I have specified configuration for compiling backend code to Nodejs environment (err I said zero configuration but yeah you need to give a configuration if you want specific output)In the
"scripts"field,watchcommand is used, the watch command doesn't start the dev-server but hot reloads and builds the code whenever something changes.
This build step is necessary because NodeJS has some limitations but with the new runtime Bun everything just works. CJS and ESM can be imported in the same file, JSX works too, I will write more about it in the continuation blog post.
You can get the Repo link below. To Recap
Transpiling is the process of converting javascript code from one dialect to the other, to a flavour of code that certain browsers/engines/runtimes can understand.
Hydration is the process of injecting javascript code into the page to make it interactive. Usually, it involves attaching event handlers to the page.
In the next post, I will use bun.js to demonstrate this example, I will also talk about CSR, SSR, ISR, Resumability, etc. I hope you have enjoyed reading this article. I'll see you folks later.
Happy coding 🚀